
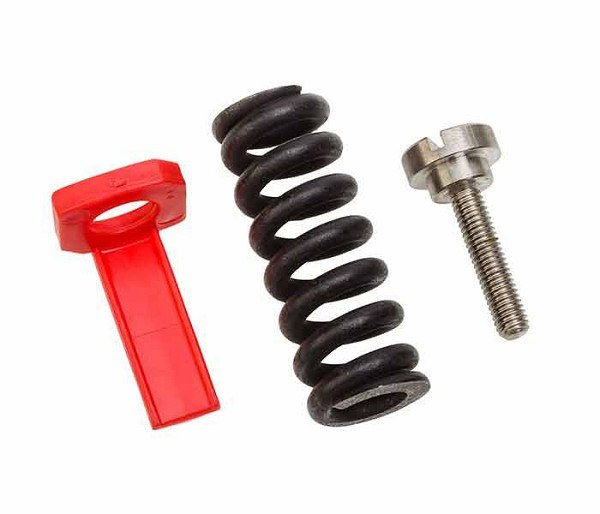
Reflex Release Mechanism Spring - Each
The Reflex Spring Set includes a stainless steel screw, a plastic marker, and a new spring which has a last generation surface treatment to improve its longevity.
Replacing the spring on a Reflex waterski release mechanism (such as the 750, 840 or 930 models) is a straightforward process. Reflex recommends replacing the spring and its stainless steel screw every two seasons in fresh water, or every year in salt water, to ensure proper safety and longevity.
Tools Needed:
Reflex Spring Set (includes the new spring, stainless steel screw, and plastic marker) - When you order this part, this is what you are getting.
Flathead screwdriver(not included here)
Needle-nose pliers (optional, to help hold the nut if it spins) (not included here)
Step-by-Step Replacement:
Access the Mechanism: Remove the release mechanism from your ski and locate the spring on the rear (or side) of the assembly.
Remove the Old Spring: Use your flathead screwdriver to carefully unscrew the stainless steel screw holding the spring in place. Set the screw and plastic marker aside, as you will be using the new ones.
Handle the Inner Nut: When you remove the screw, make sure the special nut at the bottom or side of the aluminum part remains in place. If the nut falls or turns, gently pry the sides of the aluminum part slightly to fit the nut back into its exact position.
Position the New Parts: Place the new plastic marker and the washer (if applicable to your model) over the aluminum post.
Attach the New Spring: Align the new Reflex Spring Set. Hook the spring into its designated slot and secure it by threading the new stainless steel screw through the marker, spring, and into the nut. Do not over-tighten; simply ensure it is snug.
Testing and Adjustment: After replacing the spring, always perform a safety and land-test to confirm your binding releases properly.
Visually Adjust Tension: Use a flathead screwdriver on the tension screw to align the red indicator line with your baseline target number on the release scale. Turning right increases tension; turning left decreases it.
Dry-Land Pop Test: Put on your ski boot, tighten it exactly as you would on the water, and step firmly into the mechanism. Forcefully lean forward. You should be able to pop out with a strong, deliberate push. If you can't step out, the tension is too high; if it releases too easily, it is too loose.
Watch the video on how to set your tension here!
Performance & Fit Guarantee – No worries exchanges, “You gotta love it!”
Trade Up & Trade In Guarantee – Parents and athletes on the rise love this one!
Complementary Repairs – If deemed possible and safe to repair. Sorry, we can only work on gear purchased from us!
Low Price Guarantee – Price Matching Canadian Authorized Dealers, just email us the ad or quote for review!
Test Drive - Demo Program – Not exactly sure what will work best for you? Ride it on the water or drive it on the court to make sure!
No Charge Outbound Shipping on orders over $200 – Limited exceptions... live in the boonies? We can get it there!
US Price Match Guarantee - Wouldn't You Rather Shop Canadian?
Expert Advice From Skiers, Boarders, Coaches and Picklers Who Love Our Sports! – Ensure you’re matched with gear that’s right for you!
Canada’s Largest Selection Of Products Categories & Brands – Don’t easily see what you need? Send us an email!
Supporting Our Sports, Events, Clubs and Athletes Across Canada – Giving back to our sports like no other business!
Share:
Share on Facebook Share on Twitter Share on Pinterest Tell a friend